WARNING: Although some of the following procedures can be
performed under full working line pressure, it is recommended
that any partial disassembly or maintenance be performed with
the Water Main Supply Line shut off and pressure bled!
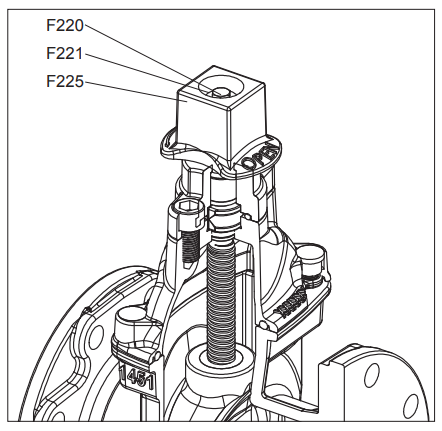
1. Remove the Wrench Nut Bolt (F220) and Wrench Nut Washer
(F221) using a 1/2”, (13mm) wrench, for 2 1/2” to 4” valve
sizes, and 11/16”, (17mm) wrench for 6” to 8” valve sizes.
Remove the Wrench Nut (F225), and replace with a new one.
(See Fig.3A)
2. Replace the Wrench Nut Bolt (F220) and Wrench Nut Washer
(F221) using a 1/2”, (13mm) wrench, for 2 1/2” to 4” valve
sizes, and 11/16”, (17mm) wrench for 6” to 8” valve sizes


WARNING: To perform the following steps, be sure the Water
Main Supply Line has been shut off, and that the pressure has
been bled off!
NOTE: Ensure that the valve is in the fully open position to ease
head assembly removal.
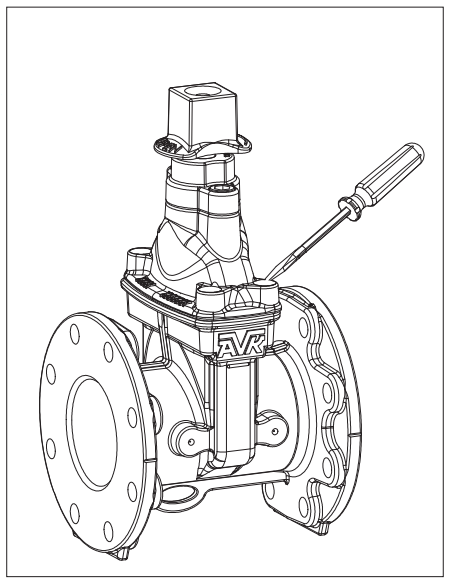
1. Using a small, flat bladed screwdriver, remove the hot melt
glue that covers the Bonnet Bolts (F216).
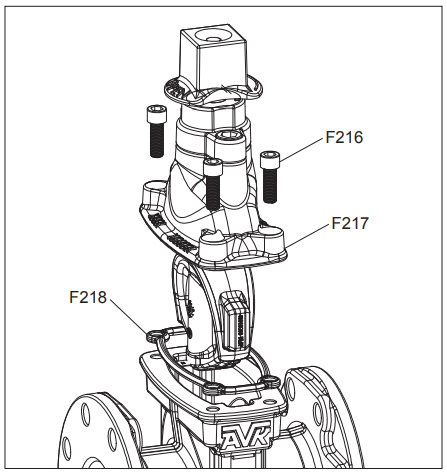
2. Once the hot melt glue has been removed, use 5/16″, or 8mm
Allen wrench to remove the 2½” valve Bonnet Bolts (F216),
and a 3/8”, or 10mm Allen wrench for valve sizes 3″- 8″.
3. Replace the Bonnet Gasket (F218). Place the Bonnet gasket
into the relief in the Bonnet (F217), and insert the Bonnet
Bolts (F216), into the bolt holes in the Bonnet (F217), and
through the Bonnet Gasket (F218).
4. Re-assemble in reverse order, torquing the Bonnet Bolts to 40
ft. lbs., in a diametrically opposed (180 degrees apart) pattern.
5. To replace the protective hot melt glue over the Bonnet Bolts,
use any EPA approved caulk, or hot melt glue.
NOTE: The Bonnet Gasket procedures can also be used on
OS&Y assemblies

| Cookie | Duration | Description |
|---|---|---|
| cookielawinfo-checkbox-analytics | 11 months | This cookie is set by GDPR Cookie Consent plugin. The cookie is used to store the user consent for the cookies in the category "Analytics". |
| cookielawinfo-checkbox-functional | 11 months | The cookie is set by GDPR cookie consent to record the user consent for the cookies in the category "Functional". |
| cookielawinfo-checkbox-necessary | 11 months | This cookie is set by GDPR Cookie Consent plugin. The cookies is used to store the user consent for the cookies in the category "Necessary". |
| cookielawinfo-checkbox-others | 11 months | This cookie is set by GDPR Cookie Consent plugin. The cookie is used to store the user consent for the cookies in the category "Other. |
| cookielawinfo-checkbox-performance | 11 months | This cookie is set by GDPR Cookie Consent plugin. The cookie is used to store the user consent for the cookies in the category "Performance". |
| viewed_cookie_policy | 11 months | The cookie is set by the GDPR Cookie Consent plugin and is used to store whether or not user has consented to the use of cookies. It does not store any personal data. |
